Bottom Bouncing Rivers: Advanced Methods and Setups
Bottom bouncing is a way of catching steelhead, salmon, and trout in a river without a float, and myself and other river guides use it. Older methods of bottom bouncing and the setups used in the past, have been significantly improved.
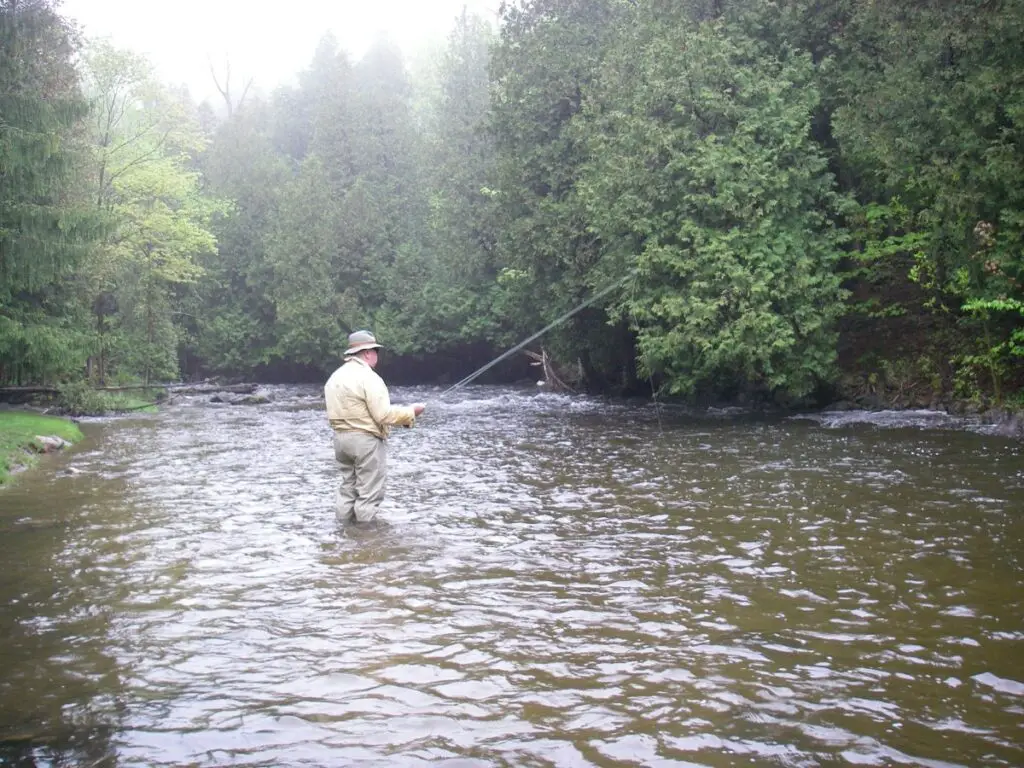
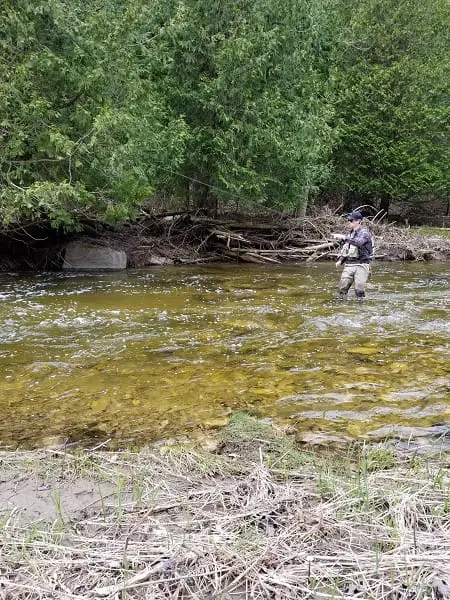
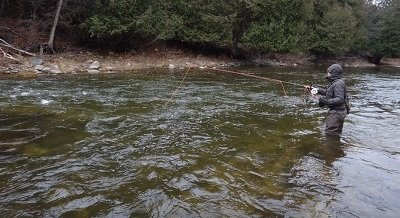
Bottom bouncing is when you cast your bait upriver and out into the main current, allowing the bait and weight to sink into the strike zone, and then you allow your rig and bait to drift freely with the current as it comes toward you and past you. Your bait should be periodically bumping and bouncing across the bottom of the river.
It’s a great way to get your bait down to the fish in a moving current, and it works best in medium to fast currents, on rocky bottom rivers, in pocket water, and in smaller riffles and runs.
Some fishermen will also call this “Drift Fishing,” which is common practice on the West Coast, but it does have a few differences.
I will show you the old method, which I rarely use anymore, and the newer methods, as well as multiple rigs, which are far more effective because they have better strike detection, provide a better presentation, and fewer snags.
How To Bottom Bounce
There are two ways to do this method: one is good, and one is not-so-good.
Old Method: The first method is to cast out, let your bait and weight sink to the bottom, and allow the line to go tight enough that the current lifts your bait up off the bottom and slowly swings it across the current.
Guys, based on my experience, anytime a “bait” swings, whether it is under a float or not, I catch far fewer fish.
Any natural food source (eggs, worms, insects) that drifts naturally and freely down the river does so in a straight line. Therefore, a bait on your hook should travel straight down the river, too. Otherwise, it looks unnatural to the fish.
For these reasons, I learned long ago that I MUST try to keep my baits moving straight down the river if I want to catch the maximum amount of fish. I believe guys that swing baits, (even a slight subtle swing) catch a tiny fraction of potential feeding fish.
Improved Method: The better and improved way is to cast your line out a short distance upriver at about a 45-degree angle out and then allow the weight and the bait to sink down to the bottom with some initial slack.
As soon as the bait hits bottom, tighten the line only enough to keep the line taut (without pulling the bait) and allow everything to drift freely down the river along the bottom.
The weight and the bait will bounce down the river past you, hence the term bottom bouncing.
The angler will maintain just enough tension on the line so that they are not pulling the bait or the weights toward them. The taut line keeps the line up and off the water which increases bottom detection and bite detection. Simply watch the line where it enters the water.
With proper tension on the mainline, if a fish grabs the bait, the line will stop, tighten, or pull, signaling a biting fish. Any slack in the line is bad.
Detecting a bite and maintaining the right amount of tension is the hardest part for most anglers to get good at. However, there are some newer rigs and methods I will show you below that make it easier to detect strikes.
It is also important to keep your mainline up and off the water so it doesn’t drag. Keeping the line up and off the water helps with strike detection.
When and Where To Bottom Bounce?
The ideal depth is 2 to 6 feet on small to medium-sized rivers, with medium to fast currents.
Slow or still water is not good.
With some adjustments to your setup, you can fish larger deeper rivers as well.
Deeper and faster rivers are where the Drift Fishing method and setup are used.
Although I and many anglers prefer float fishing, bottom bouncing also works great in fast, shallow, and small pockets where float fishing isn’t good.
In fact, this method is the most effective method in pocket water and short pools that are 2 to 4 feet deep.
Best Baits
Any bait you can drift under a float can be used to bottom bounce. My favorites are
- Plastic Steelhead Worms – 2″ to 4″ – Best colors are pink, red, brown, and purple.
- Spawn Sacks – Adjust the size to the conditions – See my Page on Roe Bags Tips and Tricks For More Steelhead and Trout
- Flies – I use different flies for different water conditions. See my page on My Best Flies For Steelhead and my page on Best Flies For Trout
- Beads – Plastic or glass beads are a great bait for trout, steelhead, and salmon. Check out my page on how to rig them and how to Fish With Beads
- Jigs: I also use micro Jigs with very good success when bottom bouncing.
I do have a page on The Best Baits For Steelhead.
Best Rods and Reels For Bottom Bouncing
Although most anglers’ bottom bounce with a spinning rod and reel, you can also bottom bounce with a Centerpin rod and reel, or with a baitcasting reel. All of them will work.
If you are fishing bigger rivers, a longer rod up to 13 feet will help you cast farther as well as keep your line under control throughout the drift.
On small to medium rivers of 10 to 40 feet wide, a rod in the 8’6 to 11-foot length is good. The weight of the rod will depend on whether you are fishing for steelhead, salmon, or trout.
I prefer lighter rods with a medium to fast sensitive rod tip.
If you are going to use a spinning reel I strongly suggest getting a good reel with a great drag system like the ones I recommend on my Best Spinning Reels For Steelhead page.
Best Line For Bottom Bouncing
I use mono or braided lines with a fluorocarbon leader. However, using a full fluorocarbon line is also effective.
- Trout Fishing: I will use a 4 to 6-pound mainline or 14 to 20-pound braid
- Steelhead Fishing: I will use an 8 to 12-pound mainline, or 14 to 20-pound braid
- Salmon Fishing: I will use a 12 to 14-pound mainline or 14 to 20-pound braid. I will upsize 2 to 5 pounds for big West Coast salmon and very big fast rivers.
One advantage to using a braided line for bottom bouncing is the no-stretch factor and the extra sensitivity of a no-stretch line for detecting strikes.
Braid also has the advantage of being very thin compared to mono or fluorocarbon lines of the same pound test.
The thin line cuts through the upper current better and does not get pushed so fast by the upper current which allows you to control your bait speed better and improves hook-ups. The downside to braid is it can freeze in below-freezing temperatures.
The Best Leader For Bottom Bouncing
For all my leaders, I will use a good quality fluorocarbon leader. Fluorocarbon has the advantage of being less visible to the fish, which can mean more bites, and it is more abrasion resistant, which means fewer break-offs.
The leader size I use will depend on the size of the fish and the current speed. I always try to use the lightest leader possible.
- Trout – 2 to 4 pound
- Steelhead – 8 to 12 pound
- Salmon – 10 to 14 pound
I highly recommend going to my page Best Leaders and Sizes to make sure you get the right size leader.
How Much Weight To Add To Your Bottom Bouncing Setup?
With each of the setups below, you only want to add just enough weight to get the bait down fast but not so heavy that it anchors to the bottom and doesn’t drift naturally with the current.
It’s often better to use less weight than too much weight.
The amount of weight will depend on the velocity of the current and the depth of each spot.
Pro Tip: I prefer to add less weight and instead cast further up the river so it has more time to sink down before reaching the prime holding area. Less weight usually allows the bait to move more naturally in the current and you won’t snag up as much.
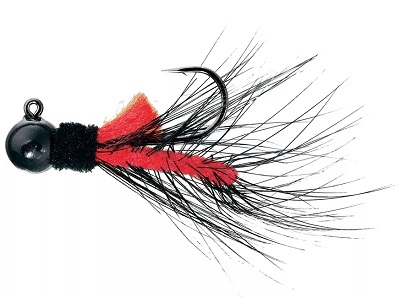
The Traditional Bottom Bouncing Rig
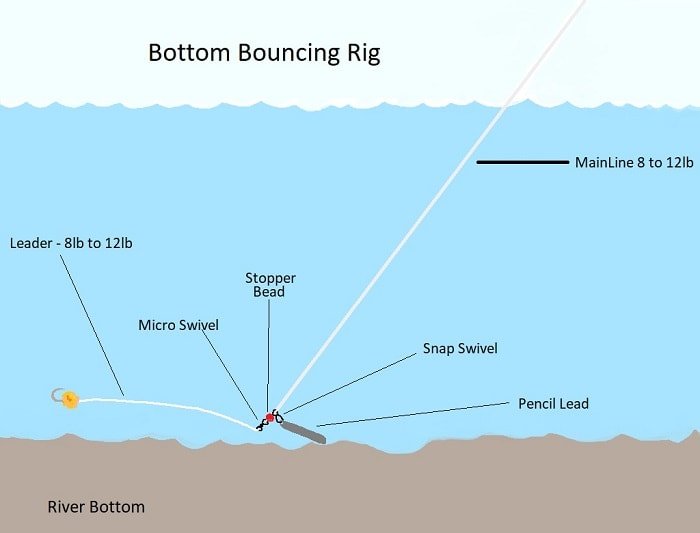
This bottom-bouncing rig is similar to the Drift Fishing rig. It is a common rig that I see many anglers and guides using.
I do not normally recommend this rig without a simple adjustment, which I will discuss below.
I’m not a huge fan of this rig because your thicker mainline is to close to the fish and could be detected by the fish.
Leader Setup:
- Leader: 12 to 24″ of Fluorocarbon
- Micro Swivel: 40 to 50 pounds
- Bead: A small bead goes above the swivel and below your weight. This prevent the weight from sliding over the swivel.
- Pencil Lead or Slinky: Attached with a tine snap and goes above the bead so it can slide up and down the line if needed.
Alternative Bottom Bouncing Rigs
These are three adjustments to the traditional bottom bouncing rig that can be better options in most rivers.
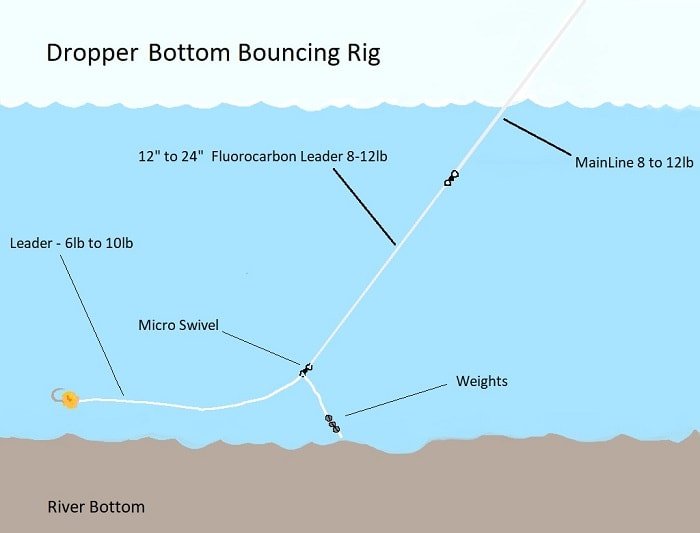
Dropper Bottom Bouncing Rig
This is very similar to the traditional rig above, but instead of having the weight in-line and on the mainline this rig allows you to have your weights on a separate dropper tag.
The advantage of this rig is that you may lose fewer baits.
The weights are also split shots, but you can use pencil lead or a slinky.
For this setup, I use an extra 12 to 36 inch fluorocarbon leader above the weights so the fish do not see it and to prevent abrasion from rocks.
Leader Formula:
- Bottom Leader: 12 to 24″ of Fluorocarbon
- Top Leader: 24 to 36″ – Depend on water clarity. Longer for very clear water.
- Micro Swivel: 40 to 50 pounds
- Tag: Leave an extra long tag when tying off the bottom leader.
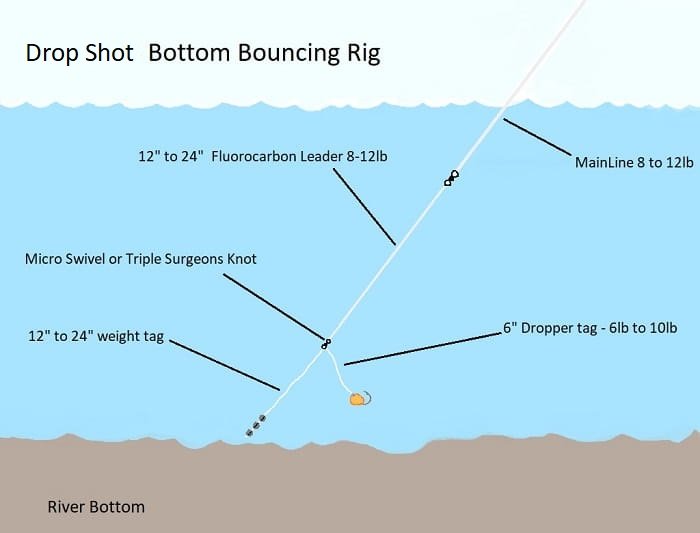
Drop Shot Bottom Bouncing Rig
This is a method I have been using for 20 years and it’s the closest thing I use to my advanced bottom bouncing method which I will discuss below.
This is the best method for controlling your bait positioning off the bottom and is superior to the traditional bottom bouncing rig.
The benefit of this bottom-bouncing setup is that you can keep your bait off the bottom and in the strike zone at all times.
With this rig, the weight is hung off a tag that comes off a micro swivel or off of a triple surgeon’s knot and the bait is then hung off a separate side tag that is about 6 to 14 inches long.
With a 12-inch weight tag combined with a 6-inch bait tag, it should keep my bait about 4 to 6 inches off the bottom.
If I want my bait even higher off the bottom I make my tag longer.
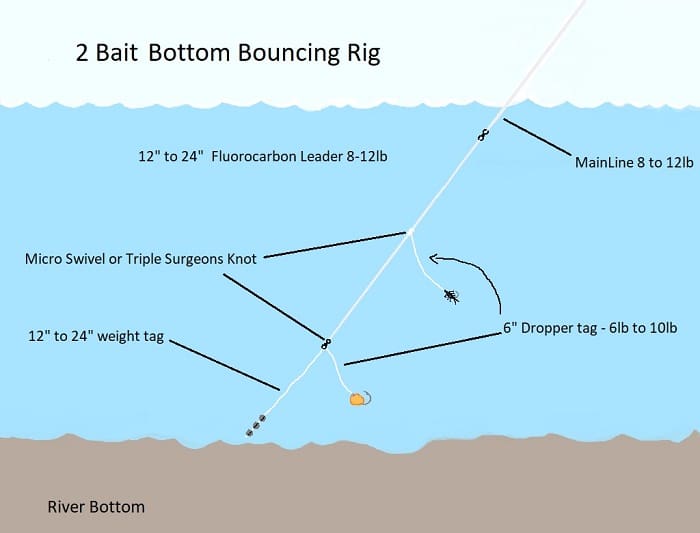
2-Bait Bottom Bouncing Rig
Almost identical to the drop shot rig above but with an added swivel or a triple surgeon’s knot where I add a second bait off a tag.
This is a great rig when the fish may be feeding near the bottom and higher in the water column.
You can keep the baits 12 to 36 inches apart by extending the leader length between the swivels.
This rig is also great for testing out baits to see what they want. I may run a bead on the top and a pink plastic worm on the bottom or many variations to find out what they want more.
Advanced Bottom Bouncing – The Better Way
This new way actually improves the speed of your bait (slows it down) and improves your ability to detect a strike. It also allows you to control the height of your bait, which ultimately means far more fish in the net.
This is the most effective way to bottom bounce in small to medium-sized spots under 7 feet deep and is great in faster rivers.
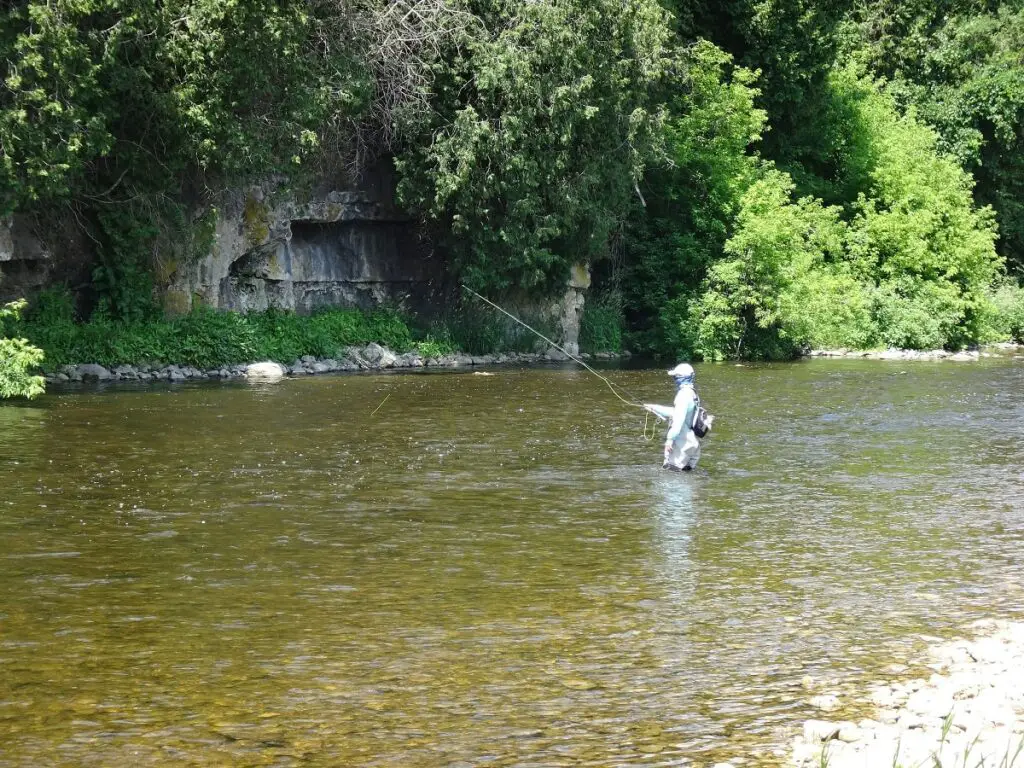
I love this method in pocket water and small spots, and to do this very effectively, I prefer to stay below the fish and cast up the river whenever possible.
This new way takes concepts from top professional tournament fly anglers and bass anglers, but don’t worry, it’s still bottom bouncing and you won’t be fly fishing or need a fly rod to do this.
The best part is that it’s easy to set up and it’s easy to use. It’s also much more effective than the traditional method of bottom bouncing if you do it right.
The setup is the same as the one or 2-Bait rigs above but with one addition to the setup. I use fluorocarbon for the entire section and leaders below the sighter.
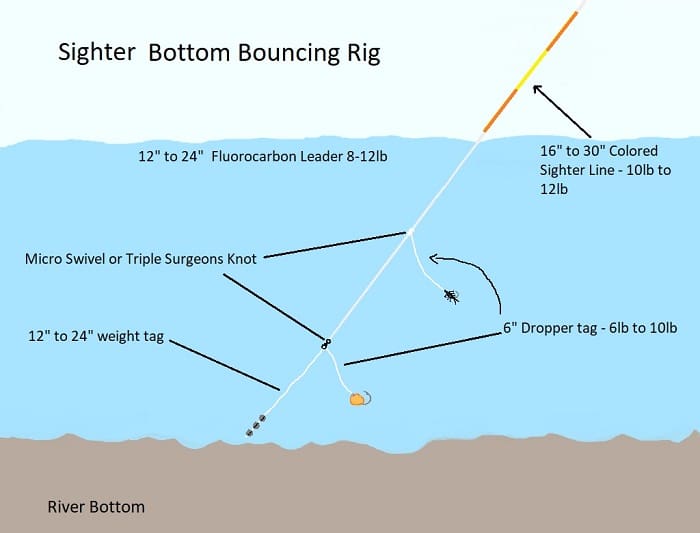
This method requires what is called a “Sighter”. A Sighter is a colored piece of line inserted above your leader. It is around 16 to 30 inches long and is around 10lb to 12lb (heavier if salmon fishing).
The Sighter stays above the water’s surface so you can see it.
If my deepest pool is 6 feet deep, my Sighter will be around 6 to 7 feet up the line from the bottom of the leader so that the sighter stay just above the water.
The Sighter acts like a visual indicator, allowing you to see subtle bites more easily. You watch the sighter closely during the drift, looking for any movements.
I set the hook if the sighter starts pulling downward, or if it’s twitching, or if the sighter straightens out quickly. Any of these things can indicate a bite.
The Sighter also allows you to see your speed and your depth better becuase of the contrasting color to the waters surface.
Speed is Critical! When you use traditional bottom bouncing, you are basically dragging your weights and bait down the river and across the bottom, which can give you a jerky and unnatural drift.
With this method, you only add enough weights to get your bait down and gently ticking along the bottom. Once you feel or see the weights hitting the bottom the idea is to slightly and gently lift the weight a few inches up and off the bottom with a small lift of the rod tip.
When I say this method improves your bait speed, I mean that it enables you to get your bait moving at a more natural speed which gives you a smoother drift that looks more enticing to the fish, and this will greatly improve how many fish will grab your bait.
Because your bait is not dragging and getting stuck on the bottom, you match the bottom current speed better, and your bait moves more naturally along the drift.
If you see your sighter moving down the river faster than the speed of the bubbles then you are going too fast and are probably pulling the line. If you are going way slower than the bubbles then your bait may be moving too slow. Use your sighter to compare the speed.
Controlling your depth is important too. You do not want your bait dragging and rolling across the bottom. It’s always best to suspend your bait 6″ to 12″ above the bottom.
You can lift and lower the sighter as needed to control your depth. If you see the bottom go deeper you lower your rod tip and the Sighter to get the bait down, and if you see the river getting shallower, you simply raise your rod. Done right, your bait will hover just off the bottom where the fish are feeding.
What You Need For Bottom Bouncing
- Mainline 8 to 12lb – See best lines for Steelhead page
- Fluorocarbon leader 6 to 10b – Thinner leaders are best – See my Best Steelhead Leaders Page
- Micro swivel – I prefer the Raven XX swivels
- Bait – See the page on my Best Steelhead Baits
- Hooks – See the page on my Best Steelhead and Trout Hooks
- Spinning Reel – See the page on the Best Spinning Reels
- Centerpin Reel – See the page on the Best Centerpin Reels
- Rod 9 to 13 feet – See the page on the Best Steelhead Rods
- Sighter Line – I use the RIO 2-Tone Indicator Tippet
- Micro Bead – I get micro-beads at dollar stores or craft stores.
- Pencil lead – I use this 1/4 inch Pencil lead and 3-way snap swivel.
- Snap Swivel
Is The Drop-Shot Bottom Bouncing Rig Legal?
In many areas bottom bouncing is legal, however, you should check the fishing regulations for your area to make sure. There are also alternative solutions to this rig that might make it legal for you, see below.
UPDATE: I was recently made aware that drop shot bottom bouncing rigs are illegal on Lake Ontario tributaries in NY – NYS DEC regulation text: “Any weight added to the line, leader, swivels, artificial fly, or lure shall not hang lower than the hook when the line or leader is held vertically”
This was provided by a reader so check the regulations in your area to confirm.
Alternate Drop-Shot Bottom Bouncing Rigs
If, for some reason, the drop-shot bottom bouncing rig is not permitted in your area, or you want to try two alternative rigs that I have used with good success, see below.
Weighted Fly Rig
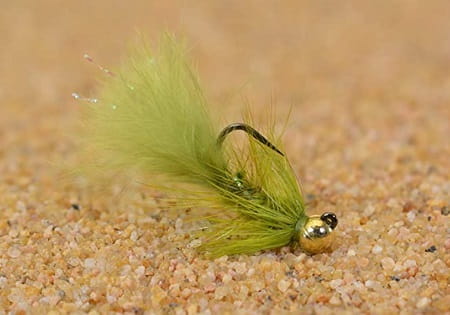
If you are allowed to run multiple baits on the line, you can add a heavily weighted nymph or a jig in place of the weights at the bottom of the Drop-Shot Bottom Bouncing Rig.
With this rig, you may have the opportunity to catch fish on the nymph or jig, or on your primary bait. I use lead-weighted flies combined with a tungsten bead head to make sure the fly is heavy enough.
To snag less often, I use Jig Fly hooks like the Region Fishing Bugger jig fly that you see in the image above. These flies drift with the hook point up so they are less likely to snag.
I will use a jig that is between 1/8 and 1 ounce, depending on the velocity and depth of the spot.
The jig is used in place of the weights at the bottom of the setup. With jigs, you can get pretty heavy, so this will work even in the deepest and fastest rivers.
Check out my favorite jigs at Jigging For Steelhead.
As you can see there are many options for fishing this method, keep at it and use it when and where it should be used and you might be pleasantly surprised.
Tight Lines
Graham,
What is my main line for bottom bouncing?
Hi-viz mono / flourocarbon / clear mono?
Hi David, I mostly use mono or copolymer lines but any type of mainline would work, even braid. The key to the whole thing is the bottom. One advantage to braid is the no stretch and sensitivity of it for detecting strikes. Braid also has the advantage of being very thin compared to mono or fluorocarbon line of the same pound test. The thin line cuts through the upper current better and does not get pushed so fast by the upper current which allows you to control your bait speed better which improves hook-ups. The downside to braid is it can freeze in below-freezing temperatures. I also updated this post to include a section of the best lines for bottom bouncing and the best leaders, Thanks for the idea.
Hi Graham, I was wondering how much weight you would usually use on smaller rivers like the Boyne or the top end of the Nottawasaga and what baits/flies usually work best for brown trout in the spring?
Hi Alex, I updated the page to answer your question. The answer to those two rivers will depend on the depth and velocity of the current.
With each of the Bottom Bouncing setups you only want to add just enough weight to get the bait down fast but not so heavy that it anchors to the bottom and doesn’t bounce along naturally with the current. Too little weight and you won’t hit the bottom fast enough or you won’t hit the bottom at all.
Different spots could require different amounts of weight, this is not a one size fits all scenario. Fishing a big deep river like the Niagara River might require triple the weight that you would need on a small trout stream. Slower water will also require less weight and in faster water, you may need to add more. I usually start with less weight and then add more if I feel like I’m not hitting the bottom enough or not getting down fast enough. I also prefer to add less weight and cast further up the river so it has more time to sink down before reaching the prime holding area. As an example, on a smaller trout-sized river that is 3 to 5 feet deep, usually 2 or 3 BB-sized split shots will work perfectly. see the post again for more.
Hey graham,
Wondering if you do any kind of “take someone out for a day and teach them to fish tnings.”
Would be interested.
Please shoot me a message if you do!
Hi John, I am a professional river guide and I run the top river guide service in Southern Ontario Canada. I take people out through my guide service. If you’re in my area look me up at http://www.aperfectdrift.com
How to set up a worm or jig for bottom bouncing?
I set my worm up and all my bait, the same way that I do when float fishing. See my page Fishing With Worms For Trout and Steelhead and my page Steelhead Jigs: The 11 Best Steelhead Jigs And How To Fish Them.
One of my best baits when bottom bouncing the last few years has been Beads. Check out my page Fishing With Beads for More Trout and Steelhead.
Good luck
Good day Graham, I live on the west coast and fish for spring chinook in a river about 40 feet wide, 3 to 8 feet deep that runs from 1000 cfs to 2500 cfs. Its moving most of the time. The drift is about 30 feet long. Do you feel the advanced bottom bouncing method would work here?
Hi Dan,
I have used bottom bouncing effectively on similar rivers on the west coast and on the great lakes. You will need to adjust your weight and leader length according to the spot that you are fishing. Watch the sighter / colored indicator closely and set fast and set on anything that looks like a possible bite.
Good Luck,
Graham
Hey Graham, do u mean use a longer hook leader with the drop shot method?
Hi Dan,
If you are using a Sighter to help you detect bites and the bottom, you might need to increase the length of the entire leader between the sighter and the bait dropper tag in order to get your bait deep enough. I never make the hook leader (bait dropper tag) more than 8″ otherwise it tangles.
Good luck,
Graham
Hi Graham,
I was just checking out your modified bottom bounce setups. The advanced ones that you describe only have the bait 6 inches from the main setup. With trout being line sensitive is there any concerns it might scare them off or are trout less line shy than most people think?
Thanks,
Greg
Hi Greg,
You are correct, line size can be an issue for line-shy trout. The leader diagram shown is my set-up for steelhead as this article was originally written with steelhead in mind. However, I just updated the text of the diagram to indicate that it’s a steelhead rig, thanks for pointing that out.
As far as line size, I would adjust my line sizes for trout, as well as for salmon.
For trout, I will drop the line size accordingly based on the size of the trout, size and speed of the river, and clarity. For salmon, I would upsize.
Thanks
Graham
Hi Graham,
Thanks for answering my question. I have one more for you. What would be the best baitfish imitation to use on the lower Niagara River bottom bouncing for winter steelhead? I always wonder if something weighted would just drag along the bottom. I guess a second question what else would you suggest to use during winter months other than beads?
Thank you
Hi Greg,
I’d use the Gulp Alive Minnow or the Berkley Gulp Alive Paddleshad or something similar and use the Drift Fishing Rig or a drop shotting rig to keep it off the bottom. You could also add floating beads to keep the bait off the bottom.
For winter baits, try single eggs and small spawn bags can be good. See my page on Winter Steelhead Fishing for more on baits, colors and tactics.
Good Luck,
Graham
Thanks so much Graham for the help you give to me and the fishing community. Keep up the great work!
Hello, Graham. For the last 4 years I’ve been trying to learn how to catch steelhead here in Buffalo, NY. I’ve been trying to float fish but find it irritating because if I don’t know the depth of the run I’m fishing, or if the depth changes throughout the run, I never know if my bait is in the proper zone or how long it takes my bait to get in the proper zone. My dumb brain says that bottom bouncing relieves me of having to worry about depth because the bottom bounce rig always finds the bottom, and once you find it, you just have to adjust how much weight you have on your rig. I just think bottom bouncing should be easier than float fishing (but everyone seems to have such success with float fishing and make it look easy). Am I thinking correctly? Or am I just not cut out for steelheading? I really want to get good at catching these tremendous fish!
Hi Steve,
In my opinion, for most guys, especially new anglers, float fishing is far easier to detect a bite and to present a bait than bottom bouncing or drift fishing. Likely why so many guys float fish. It’s also a matter of “monkey see, monkey do” Meaning if everyone is flaot fishing then it’s likely everyone new to steelhead fishing will do the same, and the cycle repeats until everyone is float fishing….
You are correct that your bait will be on the bottom more with the bottom bouncing method and for this reasonif you get good at it it can be very effective. Not getting to the bottom is an issue with float fishing and the fact is that many anglers often fish too high because they cant figure out how to find the bottom with a float. But that’s part of the learning curve, and there are ways to figure out how to find the bottom. I discuss this in my article How To Know How Deep To Set Your Float – 2 Easy Ways
Keep at work you like and what works best for you..
Good Luck
Graham
Thank you, Graham. I just saw your reply today and I”m so grateful for you taking the time! Great articles you write. Thank you.
Hope your Christmas was merry and that you have a happy and prosperous 2023!
Gratefully,
Steve
Buffalo, NY
Drop shot bottom bouncing rigs are illegal on Lake Ontario tributaries in NY according to my understanding. NYS DEC regulation text:. Any weight added to the line, leader, swivels, artificial fly, or lure shall not hang lower than the hook when the line or leader is held vertically
Hey Jeff,
That is good info to know thanks.
Graham
How much weight should be used in a very high flow rate river? too light and it moves downstream fast and may not get to the bottom; too heavy and it’s liable to not bounce. Any insight into this question or is it purely trial and error?
Hey Chris,
It will depend on the velocity and depth of each spot. So yes, basically it’s trial and error. FYI, I normally prefer less weight over too much weight.
Good luck,
Graham
How far would you be able to cast with your advanced bottom bounce set up, I am using a baitcaster to float fish right now and have gone to using heavier floats to be able to cast better. With as light as the advanced bottom bounce set up is I am guessing casting distance is short. Is it meant for close range fishing? Thanks for all these great articles, I wouldnt have started fishing without them!
It will really depend on how much weight you have but in general, a shorter 20 to 30-foot casting distance is best.
Graham
Terrific source of education on every aspect of Salmon River Steelhead fishing.
Thanks, Graham!
I am old time steelheader of 50+ years.I agree with all your information .Job well done. Did you ever try using small float with your drop shot bottom bouncing method??? It does work surprising well. Happy New Year and always Tight Lines..Paul.
Hey Paul,
Thanks for the great feedback.
Yes, I have used the same drop shot setup under a float and under a fly fishing strike indicator, and it works well.
Graham
Thanks Graham for the article, anything about brook trout is always welcome, it is such a forgotten fish compared to rainbow and brown trout.
You have written a text about the best rivers for brook trout in southern Ontario. Would you have the same information for southern Quebec, especially the Eastern Townships ? Thank you.
Glad you liked it. Unfortunately I don’t know Quebec rivers well enough to write about them.
hi graham have you ever used a 3 way swivel for bottom bouncing? if so what would the set up look like?
I have but don’t use them anymore.
whats the reason?
Because you can just as easily tie off a smaller 2 way swivel. I also prefer as small a profile and as little weight in that section as possible. In reality, it probably wont make a huge difference. However, I tend to always try to increase my percentages with everything I do, so if I think I may have a 10 percent increase in the fish not seeing all that junk near my bait and getting spooked, or the bait drifting more naturally with less weight or weight where I want it, then I’ll do it..