How To Know How Deep To Set Your Float – 2 Easy Ways

Knowing how deep to set your float is a critical part of good float fishing, and if you do this well, you will catch a lot more trout, steelhead, and salmon in the rivers you fish.
You want to set the depth of your float so that the bait is 8 to 16 inches off the bottom of the river because that puts the bait right in the fish’s face or just above their heads, which is where they feed the most.
To do this well, you need the right float, the right bait, suitable amount of weights, and then you need to know how to read the float so you know how to detect the bottom. All of this can be tricky for newer anglers.
When I do guided trips or classes, I teach my clients how to do this properly.
Detecting Bottom For Quick Float Depth
- Use a sensitive float with a pointed tip.
- Be sure the leader is set up and weighed properly.
- Use a heavier bait.
- Fish from the top of the pool and “trott” or hold the float back just enough to keep the float pointed straight up.
- At the start, guess the depth.
- Look for signs of the float tilting hard downriver, any bouncing, and quick sinking of the float. This all indicates the bottom.
- Once you find the bottom, shorten the leader length by six to twelve inches.
- Advanced detection includes “drop shot rigging,” determining holes and trenches by dragging and “mapping out” each spot.
Learning the advanced methods that I use which are described below will ensure you are catching the maximum amount of fish in each spot.
How To Know How Deep To Set Your Float
As a guide, I set or adjust my client’s floats for them because I know exactly how deep each spot is, and then I watch it like a hawk to be sure I set it properly and then adjust it if needed. I’m always adjusting the depth of the float to ensure the bait is covering all depths.
But many anglers don’t know how deep the spot they are fishing is, and they often guess and then end up fishing too high or too low. They don’t make the necessary adjustments to their float to get it down to the fish which means they are missing fish.
Presenting your bait too high over the fish’s heads or too low below them means fewer fish landed.
Setting your float too deep also means snagging on the bottom to often and losing to many hooks and baits.
A recent study indicated that fish like trout, in a river tend to feed upwards 87% of the time. These fish are feeding on food that is straight ahead at eye level or above them, which is where your bait should be.
This is why you need to set your float at about 8 to 16 inches off the bottom.
Know How Deep To Set Your Float By Finding The Bottom
I tell my clients that when they get to a new spot and they can’t see the bottom or can’t visually determine the depth of the spot, their primary goal is to find the bottom.
Finding the bottom first using your float allows you to set your float at the perfect depth and ensures you are in the strike zone more often.
The River Bottom Is Not Always Flat
One of the reasons that finding the bottom is difficult for many anglers is that the river bottom of a spot where you are fishing might not be the same depth everywhere throughout the entire spot.
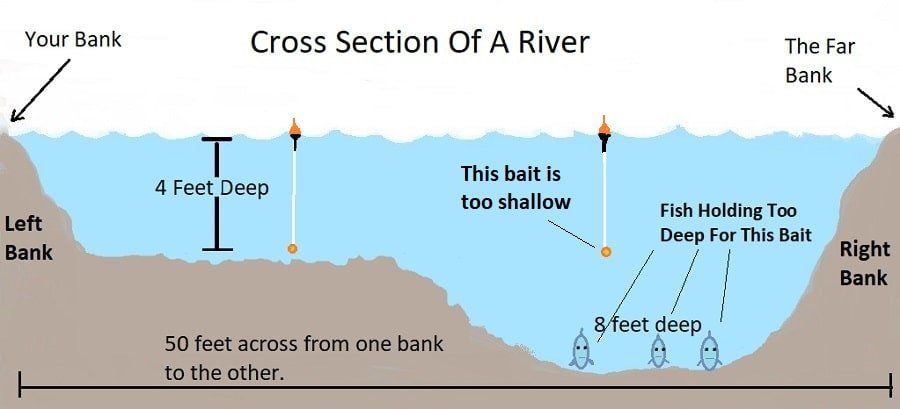
The top of the pool could be deeper or shallower than the bottom of the pool, or the far bank could be deeper or shallower than the close bank, or maybe there are some high spots or some deep spots, as seen in the diagram below. The diagram below is an the map of an actual spot I fish.
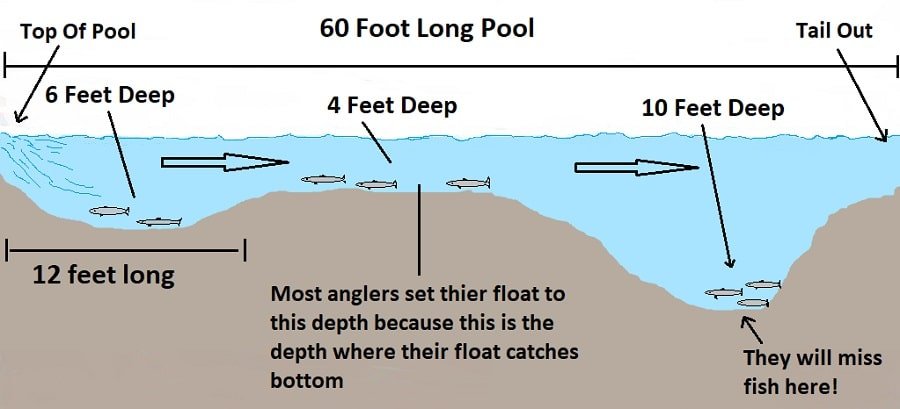
When I watch other anglers fish this spot, they set their floats for the 4-foot section because that is where they keep hooking up on the bottom, and therefore, they fish the entire pool with a four-foot leader and they miss fish in the deeper sections.
I fish this pool in three sections. I fish the top part with a five or six-foot leader, the middle part with a 3 to 4-foot leader, and the back part with a nine or ten-foot leader.
If I fish this after others have just fished this, I will often catch a lot of fish they missed in the head or tail of this spot.
I have easy methods that I use to “map out” spots like this.
Use The Right Float Type
Using the right float and knowing what size of float to use is CRITICAL for finding the bottom and when fishing.
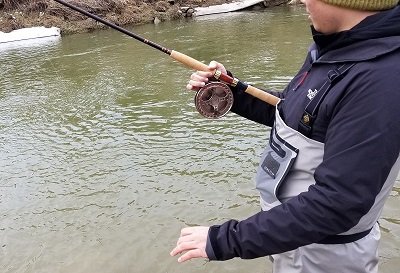
I use long thin floats designed for river fishing.
A good float is sensitive enough to detect anything that touches the bait. A good float must also be the right size, and it must be weighted properly.
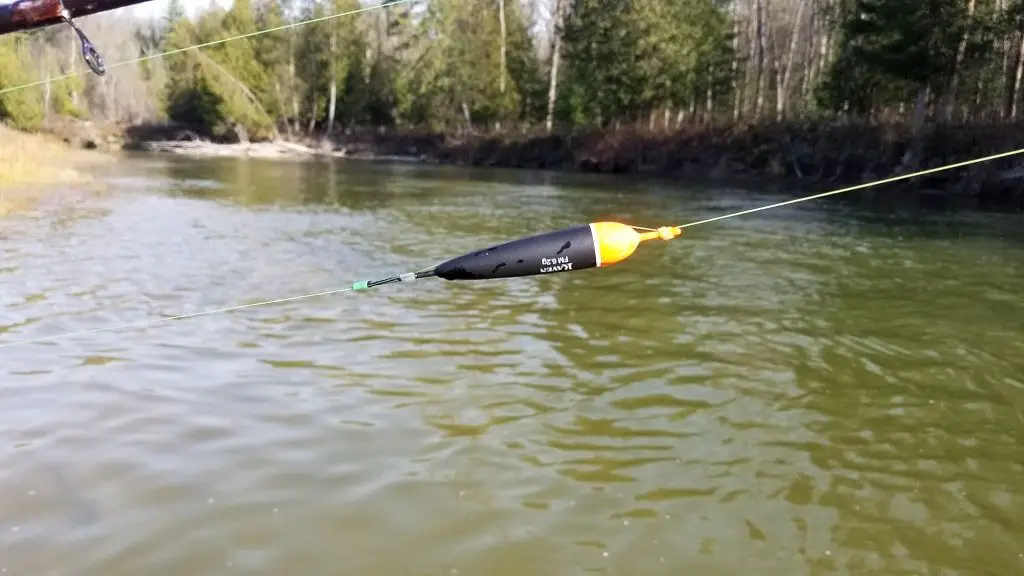
A good float also needs to have a pointed top, which enables you to determine leader angles. Understanding float and leader angles is critical for both detecting the bottom, controlling your speed, and presenting a bait more effectively.
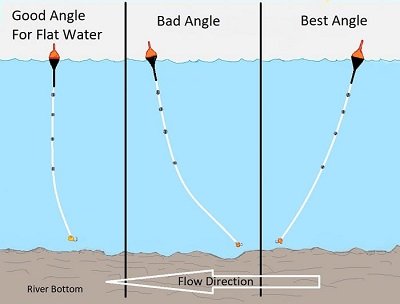
The ideal angle of your float and leader for locating the bottom is straight up. A float tilted downriver is dragging either by the current or the bottom.
A float tilted upriver is being held back too much by the angler, making it harder to detect subtle bumps on the bottom.
The tip of your float helps you determine angles, and I’ll discuss angles and detecting the bottom more below.
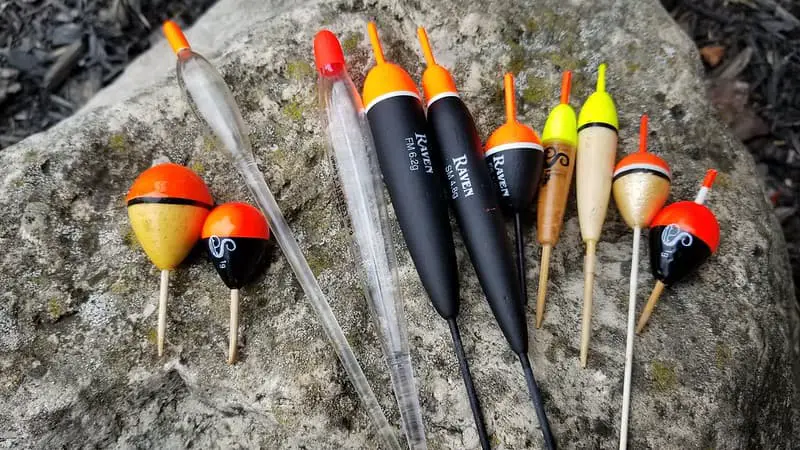
In the picture below, the two floats on the left are not good for float fishing because with their rounded tops, when they tilt, it’s hard to see the tilt and how much they are tilting.
The floats on the right side are good for float fishing. They are sensitive enough to be able to see the slightest tilting as well as any twitching and dragging.
I discuss my favorite floats on my page 5 Best Centerpin Floats For 2022.
Float Size and Weights
The size of float that I use for steelhead, trout, and salmon, depends on the depth and the velocity of the river at the spot I’m fishing.
The exception is if I need to cast very far and need to add more weight for distance, in which case a bigger float might be required. The other exception is when locating the bottom.
Smaller floats are more sensitive and they react or move easier when the bait taps the bottom. Therefore, I recommend always using the smallest float possible.
As a rule of thumb, I try to use the smallest float possible when I’m actually fishing, but I will go 1 to 2 sizes up when mapping out the bottom so that I can add a little more weight to keep the float and leader straight up and down.
Use the maximum amount of weight that your float can handle when trying to detect the bottom. Many river floats have a line on them, and that line should be even with the water.
I discuss setting up your weights and float properly on my page Float and Weights Setup.
Use The Right Bait For Finding The Bottom
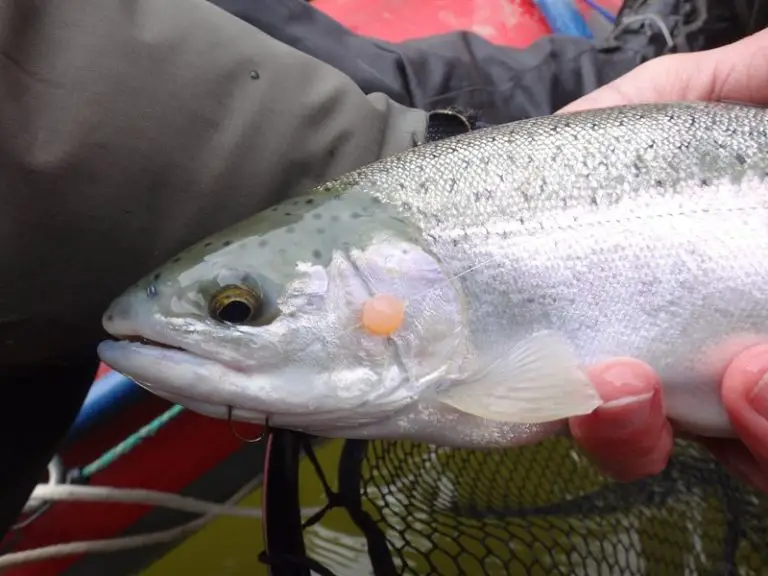
Some baits are more buoyant than others, and baits like a plastic worm that floats, or a single egg, are not good baits for finding the bottom.
Using a heavier bait like a tungsten weighted fly, or a glass bead, which are both very heavy, or even a spawn bag. Heavy or sinking baits help you find the bottom easier. Just be sure you take this into consideration when adding weight to you line so you weights and heavy bait don’t sink your float too deep.
You can also use a weight closer to a lighter bait to make it heavier near the bottom of the leader and to help you locate the bottom easier. I’ve been known to use a small black split shot as close as six inches from the bait.
Drop Shot Rig For Bottom Detection
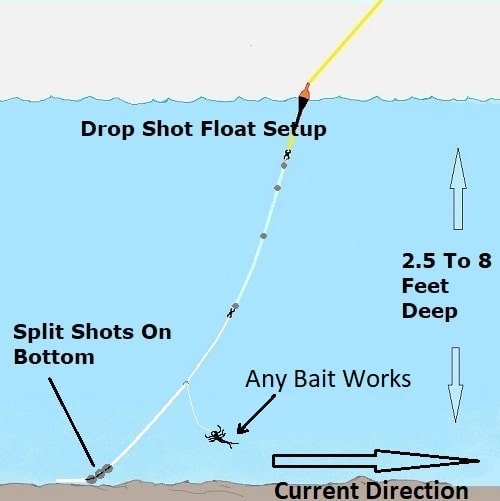
The drop shot rig is my number one rig for finding and mapping out the bottom because all the weight is at the bottom.
With the Drop Shot rig, your weight is placed at the very bottom below your bait so the weight of the bait won’t matter.
My bait is usually placed on a hanging tagline.
The tag-line can be created with a triple Surgeons Knot where you leave one tag longer for your bait, You can also use a tippet ring, or a micro swivel to tie a tag and the weight dropper line.
With the Drop Shot rig, you will only add as much weight as you need to get the weight down fast without sinking your float or constantly hanging up.
The weights will gab or drag on the bottom, which lets you know that you hit the bottom so that you can detect the depth and then adjust the leader and start fishing.
With this rig, you will lose some weight if it gets snagged up badly, but the bonus is that you also lose fewer hooks, flies, or baits. And since weights are usually cheaper and easier to replace, I prefer to lose weights.
Since the heavy weights are at the bottom of the drop shot rig, your float will often twitch, bounce, or keep tilting hard downriver more aggressively which indicates that the weight is hitting the bottom or is hanging up.
However, I mostly use this method just to “map out” the river bottom and to determine depths throughout the entire spot. Once the bottom in mapped out, I then switch to a more productive leader setup. I discuss “mapping out” the bottom below.
For more on the best float fishing leaders for shallow, deep, fast, and slow water, see my page 5 Best Float Fishing Leader Setups.
Mapping Out The Bottom – Why It’s Important
I would not be as good as a guide if I didn’t know my spots and depths well. This is why I map out the bottom on all spots that I fish where I can’t see the bottom. Doing so enables me and my clients to catch the maximum amount of fish.
Mapping out the bottom has enabled me to detect deep spots that I didn’t know were there, high spots that I just thought were the normal depth of the entire bottom, and mapping allows me to find and fish what I call “trenches” or holes.
Finding these holes, trenches, and high spots enable me to set my depth far more accurately. Once I learned how to map the bottom, I realized that I, and likely most other anglers have been missing fish!
I fish or drift my float in lines from the top of the pool to the bottom of the pool, and I find the bottom with every line until I know where the bottom is. This is how I map out the bottom of the pool. I discuss how I find holes and trenches below.
An added bonus to mapping out the bottom and knowing where these shallow and deep spots are is that there are times of the year or even times of the day when fish will hold in these deeper spots. During high sun and in the winter, these deeper holes are where I would catch 90% of the fish.
During low light hours or when the fish are moving in early fall, I will catch almost all my steelhead at the top of the pool near the rapids, which is where they will stop for a couple of minutes to rest before they shoot up through the rapids to the next pool. This is a great spot in the early morning and just before dark when they are ready to start moving up the river.
During mid-day, when the sun is high, and the fish stop moving, or if they are less active, I stop catching fish at the top of the pool, and I will catch them all in the middle of the pool where the current is slower.
In late fall or wintertime, when the water is ice cold, I only catch fish in the deepest part of the pool where they are holding. This is why mapping this one particular pool has put hundreds of steelheads on the line for my clients that other angler have missed.
An angler that doesn’t have this pool mapped out and doesn’t know there are shallow and deep spots will hit bottom in the middle of the pool where it is shallowest and then set their float at 3 to 4 feet deep and that means they will miss all those fish sitting 9 feet down.
I see this happen all the time, anglers bump or locate the bottom in the high spot, they set their float to that level, and then never touch it again, and then they miss a lot of fish because of this.
The first thing to do when setting my float to start mapping out the river is to look at the spot I am about to fish and I try to determine or guess how deep it is by what i can see with my eyes.
At the edge of the bank, I might be able to see the bottom. If so I try to look as far out out until it looks to be about 3 to 5 feet deep, or try to guess the depths where I lose sight of the bottom. This is the depth that I would start with.
If I lose sight of the bottom at three feet deep I set my float to three feet deep and make a cast in that spot to see if I either hook a fish or if I hook bottom. If nothing happens, I make it one foot deeper and cast into the same spot, and see what happens.
I use the angle of my float to help detect the bottom, if it keeps hard tilting downriver I’m hitting or dragging the bottom, if it stays straight up and down, I’m not hitting bottom yet.
If I don’t hit bottom on my first couple of drifts, I will keep making my float deeper until I start hitting the bottom. Once I hit bottom, I will make my leader six to twelve inches shallower because I know fish feed up and I will make a couple of casts and hope for a fish.
Then I will move my float out toward the middle about one foot further, and see what happens in that line. If I don’t hit the bottom there, I will make it one foot deeper and I will repeat until I hit the bottom there and then move it one foot further again and repeat the process.
I will repeat this method all the way across the entire spot because it might be four feet deep ten feet out from the edge of the bank that you are standing on, but it might be 8 feet deep, or fifteen feet further out in the middle or near the far bank.
Once I have mapped out the bottom of the river, I memorize it so I know how deep I need to be each and every time I fish that same spot.
The key is, once you start hitting the bottom, shorten up your leader by 12 inches so you are not dragging the bottom.
When I move to the next spot I repeat the process.
If you want to know how I teach my clients to fish in lines or how to cover the water effectively, I suggest reading my article Effectively Covering The Water When Float Fishing.
How Do You Find The Holes?

Finding the holes can be difficult but it’s not impossible.
Once I have determined the average bottom depth and have fished the entire pool at that depth. I will then make the leader about 24 inches deeper and fish the entire pool again. My goal is to purposely drag a heavy bait from the top of the pool to the bottom to ensure there is no depth change.
There are times when it will drag for twenty feet, and then the float will stand straight up, which indicates it just got deeper, and i just found a hole or trench.
Once I find the bottom again in this trench, I will make my leader 12 inches shallower and make a couple of good clean drifts at the right depth. Good clean drift means having the proper angle and speed.
Speed control is the most critical fundamental of good float fishing and you can see more about that on my page Controlling Your Speed For More Fish When Float Fishing.
To remember where my holes are, I will sometimes line the top or start of the hole up to a rock, tree, or something on the bank that will help me remember the hole when I return. I have even taken a rock from the bank and placed it high on the bank or beside a tree to indicate where the deep hole starts.
Sometimes a hole or trench on the bottom might only be a small 8-foot long by 3-foot wide trench that is 3 or 4 feet deeper than the rest of the pool, but often many fish will hold there, and often these trenches and holes account for 50% of the fish I catch.
I will also remember where the end of the hole is. The hole might be 5 feet long or 35 feet long so it’s good to know where it ends.
I repeat all these steps and drag the bottom from one bank to the other and from the top of the pool to the bottom of the pool until I have completely mapped out this pool, and then I move to the next one and do it again.
Fundamentals Of Float Fishing
Controlling your depth during the presentation is only one of the 4 fundamentals of float fishing that I teach when guiding. Sure, being good at setting your depth will help, but only if you also do the other 3 fundamentals well.
It’s important to know and do all 4 fundamentals well if you really want to catch more fish when float fishing. If you are not sure what these 4 fundamentals are, check out my page Centerpin Fishing For Beginners: 20 Steps From A Top Guide.
Also, if you know someone that struggles to catch fish when float fishing, be a good friend and share this website with them too.
Got A Question About How Deep To Set Your Float
The two best methods for finding the bottom are to use the drop shot rig or use the drag method with a heavy bait or fly. If you have a question, comment, or tip regarding how deep to set your float let me and other readers know in the comments section below.
Tight Lines
Graham
I’m already assuming that you have your full set up already when float fishing. Float, swivel, shot line, swivel, leader then bait. I’m reading your article about when you’re trying to find the bottom and you said once you find the bottom you shorten your “leader”? So you cut off your leader line and retie it with your new baits shorter? Or do You just mean shortening it by pulling your float down lower? I’m confused. I’m fresh to the float fishing and your information has opened my eyes to ALL of my mistakes.
When I mention shortening or lengthening the leader I’m usually referring to just sliding your float down or up to the right depth. Rarely will I cut the leader to make it shorter. Good luck.
HI Graham, I use West Coast Floats primarily and fish the big and small river of Southern Oregon (Elk, Sixes, Rogue, and Chetco).
The one aspect of float fishing I struggle with, at least using West Coast Floats, is to know what size to use on a given stretch of river. The floats range from 1/8 – 1oz for steelhead. I’m familiar with shortening or lengthening the leader, but it still leaves me wondering if I’m using the correct size float.
Let’s say I choose to fish a 1/8oz jig and a 1/4oz inline weight with a 3/8oz float. Lengthening or shortening the leader aside, how do I know whether to stick with the same set-up, go down (i.e. 1/8oz jig + 1/8oz inline weight and a 1/4oz float), or go up (1/8oz jig + 3/8oz inline weight with a 1/2oz float)?
Hi Ben, Great question, I added a section on that topic just above the comments section on this page, I hope it helps answer your question.
Graham
Hi Graham, I’ve got four questions for your drop shot rig. #1 How much line do you usually have between your bait and your bottom weights?
#2 How much weights do you recommend at the bottom of the drop shot rig?
#3 Is this a rig that you can fish with or more so just to find bottom?
#4 If you can fish this rig, once you found bottom, how far off the bottom do you keep your weights for your next drifts?
Thanks
Hey Chris,
Good questions, thanks.
I updated that portion and other portions of this article to answer these questions and be more clear, but in a nutshell, add as much weight as you need to get the weight down fast without sinking your float or constantly hanging up.
Yes, you can fish it, but I mostly use this rig for mapping out the bottom and then change to a more effective leader.
If I were to fish it, once I locate the bottom, I’d shorten the leader by 6 to 12 inches.
Best of luck
Graham
Hi Graham
Thanks for the great website. If you have mapped out a hole that was 30 feet long, similar to your example above with various depths, would you continue to use your current rig setup or go to your standard float setup. Also would you fish the depth sections separately or do a 30 foot drift and try to place the bait in every elevation, and if so how would you do that, trotting? Any help would be appreciated
Thanks
Hi Randy,
Good questions, I’ve updates the article.
In a nutshell, you can fish the same setup that you used for mapping or while mapping, but it’s better to use a different leader once you’ve completely mapped out the spot. If a spot has multiple depths, I will often break it apart into smaller sections and fish each depth separately.
Hope that helps,
Graham
Graham,
Love your articles, read and reread them. Full of great advice. I have made a lot of the mistakes you talk about. Headed over Thur. evening and fishing Fri. thru Monday.
Can’t wait to try your advice. Love centerpinning. It is the challenge I like.
Thank you Graham.
I’m happy to help. Good luck